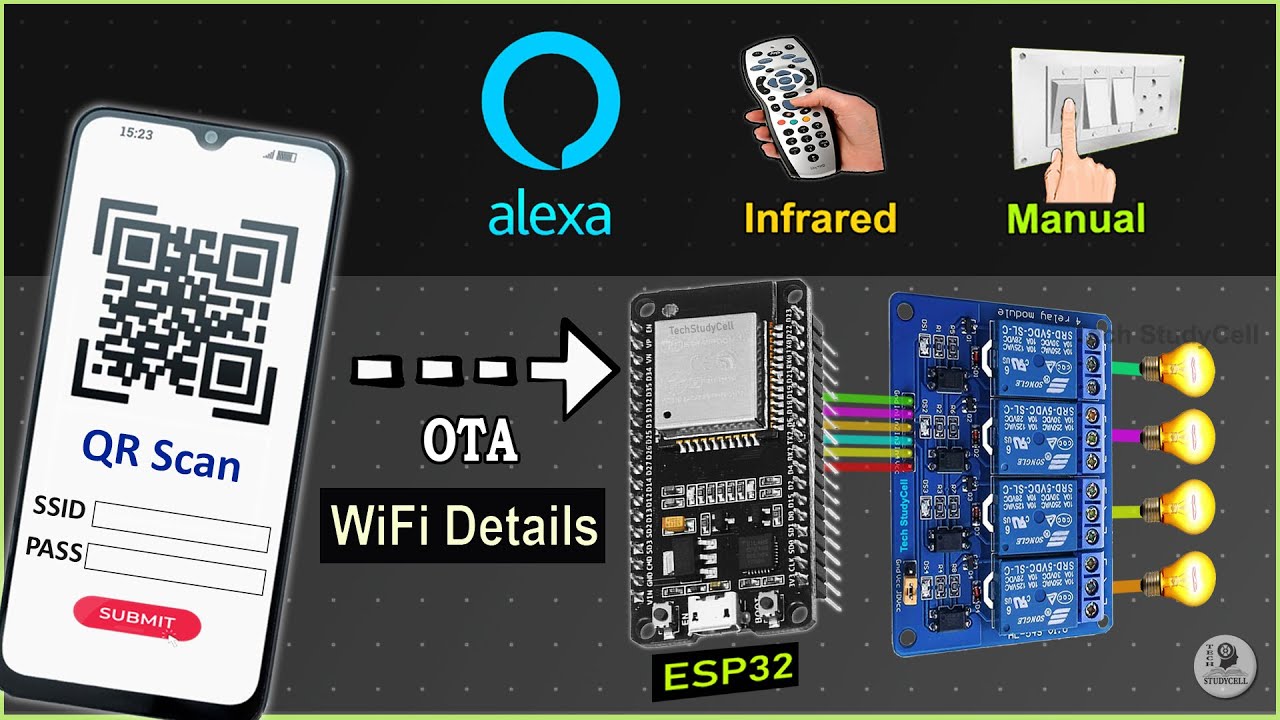
Welcome to Tech Study Cell, where we dive into the exciting world of IoT projects! In this article, we will explore how to create a smart home automation system using ESP32 and Alexa. But here’s the twist – we won’t be hardcoding any Wi-Fi credentials into the code. Instead, we’ll learn how to update or enter the Wi-Fi credentials wirelessly using a mobile app.
To achieve this, we’ll be using the Wi-Fi probe library and the ESP BLE provisioning app, both of which are completely free. Follow along as we guide you through the entire process of implementing these features in any IoT application.
Contents
Getting Started
To demonstrate this project, we’ll be using our previous ESP Alexa project. However, you can use any ESP32 and a suitable code base to create your own Alexa home automation project. The best part is, you won’t require any third-party IoT applications.
Let’s take a look at the components you’ll need for this project:
- ESP32
- Active low relay module
- Laptop or computer
- IR remote (optional)
Building the Circuit
Before we delve into the code, let’s first connect the components as per the circuit diagram. While the circuit itself is relatively simple, you have the option to design a PCB to make it more compact. We recommend using the free PCB assembly service from JLC PCB for a hassle-free experience.
Once you’ve assembled the circuit, you can convert it into a PCB. JLC PCB provides detailed instructions on how to generate the necessary files, such as the PCB Java file, BOM file, and pick-and-place file. After placing the order, you’ll receive the high-quality PCB in no time.
Writing the Code
To start coding our project, head to our website Techal and download the source code for this project. Make sure you have the necessary ESP32 board and libraries installed.
Next, open the code for the switch and customize it according to your requirements. You’ll need to provide the device name, PIN, GPIO pins for the relays and switches, and any additional settings like the IR remote hex code.
To enable wireless entering of Wi-Fi credentials, we’ll use the Wi-Fi probe example code provided. This code allows you to easily enter the Wi-Fi credentials through the Expressive mobile app. Copy the relevant functions and setup code into your main code.
Uploading the Code
Before uploading the code to the ESP32, make sure to select the correct board and partition scheme in the Arduino IDE. Once uploaded, open the serial monitor to see the QR code. Copy the QR code and paste it into a text editor.
Provisioning Wi-Fi Credentials
To wirelessly provision the Wi-Fi credentials, download the ESP BLE provisioning app from the Google Play Store. Make sure your mobile phone’s Bluetooth and location settings are enabled. Open the app and scan the QR code you copied earlier. Enter the Wi-Fi credentials in the app and click on provision.
Once the process is complete, the blue LED on the ESP32 will indicate a successful connection to the Wi-Fi network. Now, it’s time to add the devices to the Amazon Alexa app.
Integrating with Amazon Alexa
Launch the Amazon Alexa app and navigate to the device settings. Select “Add Device” and choose the “Light” option. Tap on “Wi-Fi” and then “Discover Devices.” After a brief moment, you should see the four devices we named in the code. Follow the on-screen prompts to set up the devices.
Now, you can control your appliances using the Amazon Alexa app. Simply command Alexa to turn on or off the lights, and watch as your relay modules respond accordingly. You can control the appliances even when you’re not on the same Wi-Fi network as long as your Echo Dot and ESP32 are connected to the internet.
Updating Wi-Fi Credentials
If at any point you need to update the Wi-Fi credentials, simply connect the ESP32 to your laptop and open the serial monitor. Press the boot button for five seconds to enter setup mode. You’ll receive a new QR code on the serial monitor. Copy and paste it into a text editor, then open the ESP BLE provisioning app on your mobile phone.
Scan the new QR code, enter the updated Wi-Fi credentials, and click on provision. Your ESP32 will be updated with the new Wi-Fi details.
Conclusion
Congratulations! You’ve successfully built your own IoT project using ESP32 and Alexa home automation. By wirelessly updating the Wi-Fi credentials, you can easily manage your smart home without needing to hardcode any Wi-Fi details.
Feel free to experiment with different IoT applications and let us know if you have any questions. Don’t forget to share this article with your friends who are interested in exploring the world of IoT. Thanks for joining us, and happy building!
