Have you ever wanted to keep track of your water level without the hassle of constantly checking it? Look no further! In this project, we will show you how to build an IoT-based water level indicator using the NodeMCU ESP8266 and the Blynk app. With just a few components and a little bit of programming, you can receive notifications and control your water pump automatically. Let’s get started!
Contents
Components Needed
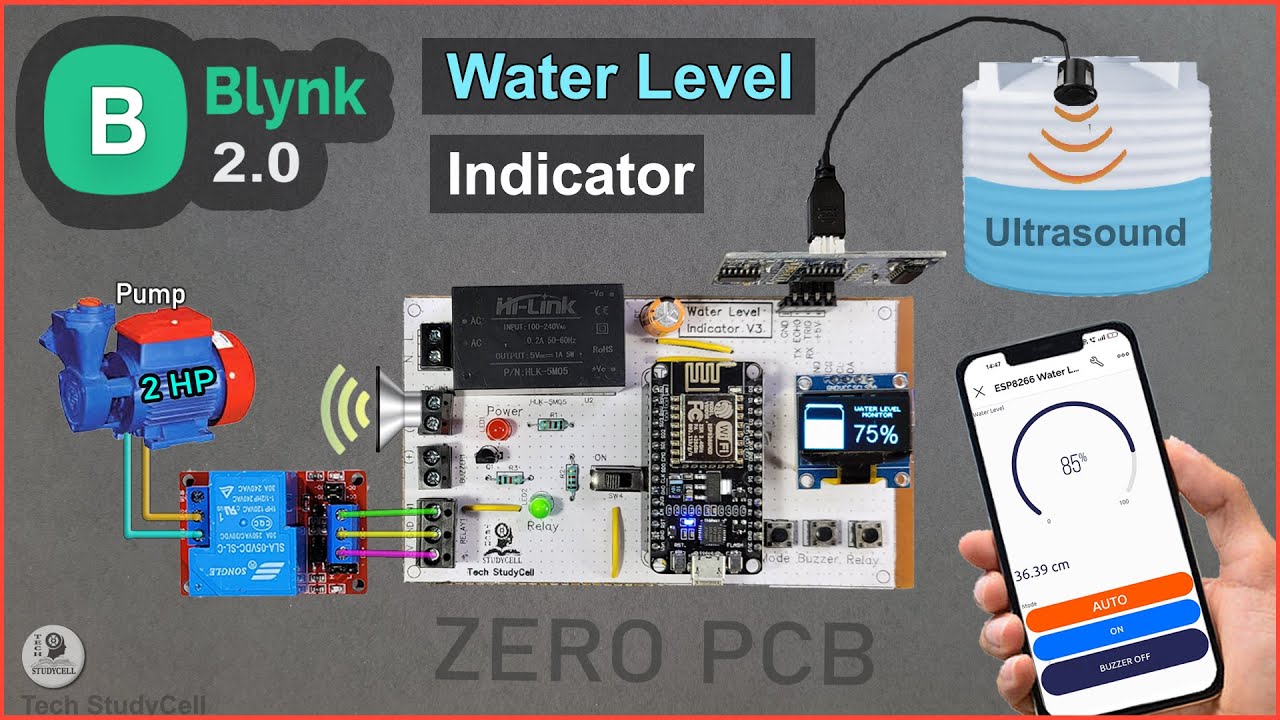
- NodeMCU ESP8266
- Waterproof Ultrasonic Sensor or AC SH04 Ultrasonic Sensor
- 5V 30A Relay Module
- Buzzer
- AC Lamp (for demonstration purposes)
Circuit Diagram and PCB Layout
To make the circuit more compact, we have designed a PCB layout using the LTM PCB Designer software. You can find the layout file in the video description. Simply print it out and follow the grid to place the components on the Zero PCB. Solder all the components and connect them according to the circuit diagram. You can download the circuit diagram from the video description.

Programming the NodeMCU
Before programming the NodeMCU, we need to configure the Blynk Cloud for ESP8266. Follow the steps below:
- Create a new template in the Blynk Cloud and name it “Hardware: ESP8266”.
- Add four data streams: “Water Level” (V1), “Distance” (V2), “Mode” (V3), and “Buzzer” (V5).
- Define the minimum and maximum values for each data stream.
- Use the automation feature to create rules for the water level data stream.
Next, open the source code for this project. You can download it from our website iotcircuithub.com. Make sure to install the required libraries and select the correct ESP8266 board and port in the Arduino IDE. Update the variables in the code with the appropriate values for your setup, such as empty tank distance, full tank distance, and trigger percentage. Upload the code to the NodeMCU.
Configuring the Mobile Dashboard
To monitor the water level and control the pump, we need to configure the Blynk mobile app. Follow these steps:
- Open the Blynk app and tap on the device you added earlier.
- Enter edit mode and add a gauge visit to display the water level.
- Add a value display widget to show the distance between the water level and the sensor.
- Add three button widgets: one for the mode switch, one for the relay (to control the pump manually), and one to reset the buzzer.
- Assign the appropriate data streams to each widget.
- Exit edit mode.
Now you can see the water level percentage, monitor the mode (auto or manual), and control the pump and buzzer from your mobile dashboard.
Testing and Final Setup
Connect the relay module and buzzer to the PCB according to the circuit diagram. Instead of the pump, you can connect an AC lamp for demonstration purposes. Turn on the power supply and enjoy the benefits of the water level indicator. When the water level drops below the trigger percentage, you will receive a Blink notification, and the pump will automatically turn on. You can also manually control the lamp, pump, and buzzer from the mobile app.
FAQs
Q: Can I use a different ultrasonic sensor for this project?
A: Yes, you can use any ultrasonic sensor, but make sure to adjust the code accordingly.
Q: Is it possible to monitor multiple tanks using this setup?
A: Yes, you can modify the code and PCB layout to accommodate multiple tanks.
Q: Can I use this project for other liquid level monitoring?
A: Yes, you can use it for other liquids by adjusting the trigger percentage and sensor placement.
Q: Is there a limit to the distance between the sensor and the water level?
A: The maximum distance depends on the sensor you are using. Refer to the datasheet for more information.
Conclusion
Building an IoT water level indicator using the NodeMCU ESP8266 and Blynk app is a practical and useful project that allows you to monitor and control your water level effortlessly. By following the steps outlined in this guide, you can create your own system, customize it to your needs, and enjoy the convenience of automated water management. Happy making!
