Have you ever wondered how to program the ESP32-CAM using an Arduino UNO? Well, wonder no more! In this exciting video, we will delve into the fascinating world of programming and explore the endless possibilities that arise when you combine these two powerful devices.
Before we dive in, let’s address the elephant in the room. Connecting the ESP32-CAM directly to your laptop can be a bit tricky. But fear not! We have a solution for you. Instead of using a USB to serial interface board, we can utilize the mighty Arduino UNO to program our beloved ESP32-CAM.
In this tutorial, I will guide you through the entire process, providing you with all the necessary information to successfully program your ESP32-CAM using an Arduino UNO. From circuit diagrams to essential settings, I’ve got you covered.
To embark on this epic journey, make sure you have subscribed to our TechStudyCell channel. By subscribing, you not only gain access to this video but also support us in creating more informative and engaging content.
Now, let’s get down to business!
Contents
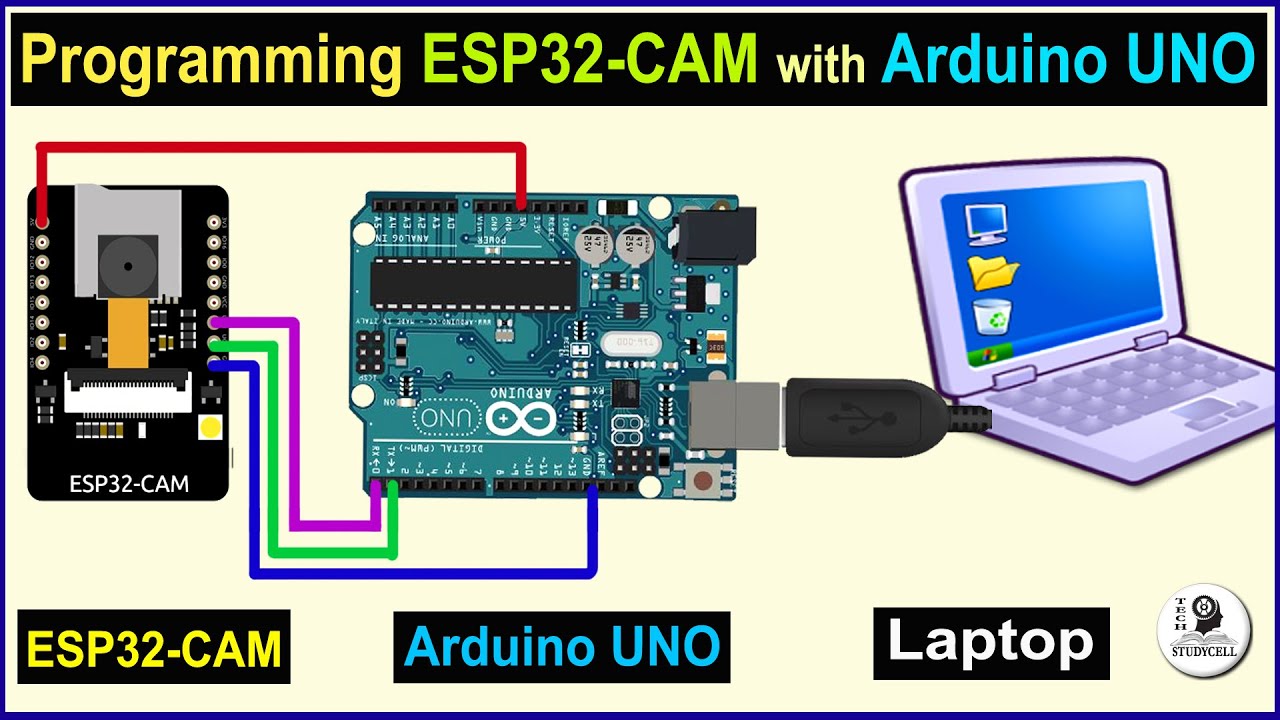
Connecting ESP32-CAM with Arduino UNO
To establish the connection between the ESP32-CAM and the Arduino UNO, we need to follow a specific circuit diagram. The diagram entails connecting the TX to TX, RX to RX, GND to GND, and 5V to 5V. Additionally, we must connect the RESET pin of the Arduino to GND. During programming, the GPIO-0 should be connected to GND as well.
Once we have connected these two magnificent boards according to the circuit diagram, we can proceed to connect the Arduino to our laptop.
Setting Up the Arduino IDE
To ensure a seamless programming experience, we need to make a few changes in the Arduino IDE. First, navigate to File, then Preference, and paste the following URLs in the Additional Board Manager URLs section. You can find these URLs in the video description.
Next, go to Tools, then Boards, and select Boards Manager. Type ESP32 and install the ESP32 board. Don’t worry if you already have it installed.
Uploading Example Sketch
To kick-start our programming adventure, we will upload an example sketch. Go to File, then Examples, select ESP32, navigate to Camera, and finally, choose Camera Web Server. Voila! We have our sketch ready for upload.
In the sketch, you need to fill in your WiFi credentials, including the WiFi name and password. Additionally, you must select the camera model you are using for this project. If you’re using the AI thinker camera model, simply uncomment the corresponding line.
Now, let’s configure the necessary settings. Go to Tools, then select ESP32 Wrover Module as the board. In the flash mode, choose “QIO”. For the partition scheme, opt for “Huge APP”. Set the flash frequency to 40Hz and select the upload speed as 115200. Make sure to choose the correct port, which should display the connected Arduino UNO.
As for the programmer, select “AVR ISP”. Ensure all the settings match the ones I have shown you.
With everything set up, it’s time to upload the sketch. Click on the upload button and get ready for the magic to unfold!
The Moment of Truth
To initiate the upload process, press the reset button once on the ESP32-CAM. Observe as the code gracefully flows into the ESP32-CAM board. As a delightful bonus, you will notice the transmitter and receiver LEDs blinking on the Arduino UNO board, assuring you that progress is being made.
Once the uploading is complete, it’s time to disconnect the wire that connects the RESET pin with GPIO-0. With this wire out of the equation, we move forward fearlessly.
To witness the fruits of our labor, open the serial monitor and choose the baud rate as 115200. Now, if you press the reset button on the ESP32-CAM, you should be greeted with an IP address. Exciting, isn’t it?
Copy the IP address and paste it into your browser. Brace yourself as you click on the coveted “Start Stream” button. In the blink of an eye, the stream will commence, showcasing the sheer power and potential of the ESP32-CAM board.
But wait, there’s more! By enabling face recognition, you will unlock a whole new level of awesomeness. And fear not, for your journey is closely monitored via the serial monitor, ensuring everything runs smoothly.
Unleash Your Creativity
With the code successfully uploaded, you can now disconnect the ESP32-CAM board from the Arduino UNO. This newfound freedom allows you to connect the ESP32-CAM to different circuits, paving the way for a wide range of thrilling projects.
Follow all the steps meticulously, and you should encounter no errors along the way. However, if any pesky connection errors persist, fear not! Simply disconnect the Arduino from your laptop and give it another shot.
If this video has ignited a spark within you, please show your support with a resounding Thumbs Up and share it with your friends. Remember to subscribe to our channel for more captivating content in the future.
Thank you for joining us on this exhilarating journey. May your days be filled with endless possibilities and captivating creations. Keep dreaming big and exploring the vast realm of technology!
