Welcome to Techal, your go-to source for all things technology. In this article, we will explore exciting IoT projects for your final year using NodeMCU ESP8266 Blynk with Sensors, specifically focusing on creating a smart home. Imagine controlling various appliances with just a tap on your smartphone or using an IR remote. Intrigued? Let’s dive in!
Contents
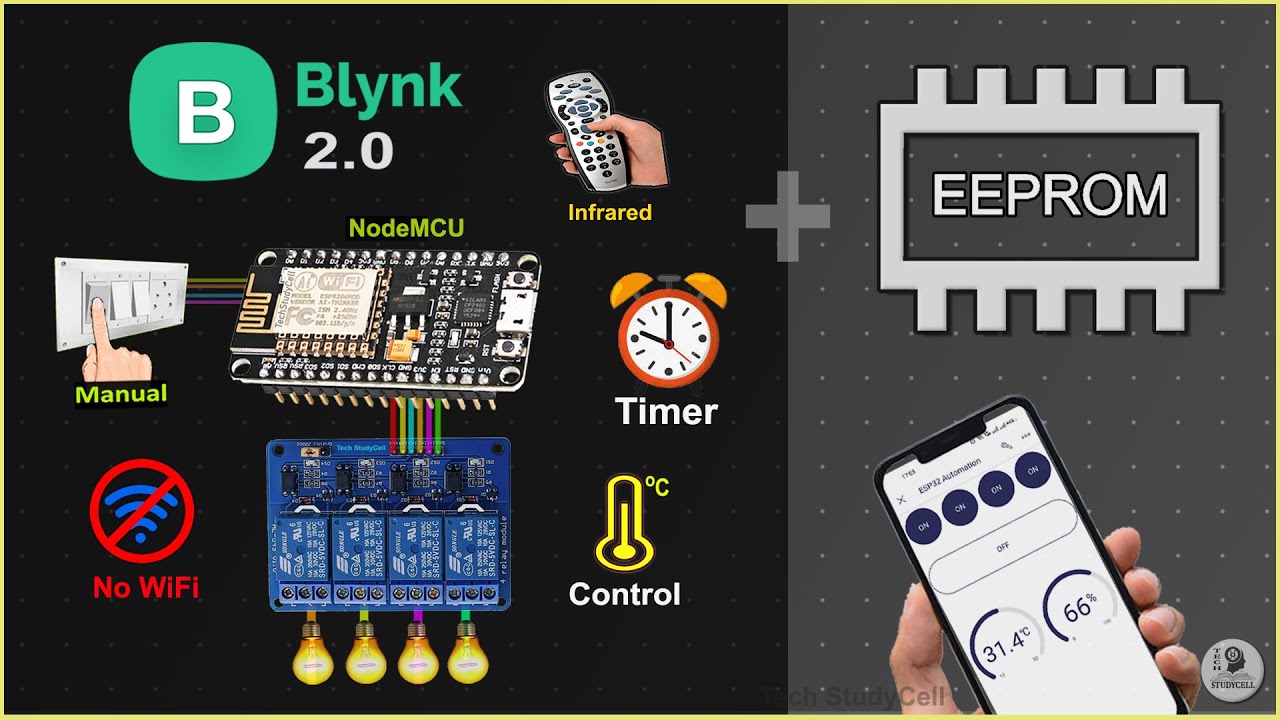
Saving the Last GPIO States in ESP8266 Flash Memory
One of the key features we will discuss is the ability of the ESP8266 to save the last GPIO (General Purpose Input/Output) states in its flash memory. This means that even if there is a power failure, the ESP8266 will remember the previous state and restore it once the power is back on.

To achieve this, we utilize the Blynk IoT app, IR remote, and manual switches or push buttons. Additionally, we can incorporate Blynk Automation to control relays automatically based on timers and room temperature. This flexible and versatile IoT project allows you to customize your smart home to suit your needs.
Circuit Connection and Configuration
To get started, you will need the following components for this project:
- NodeMCU ESP8266
- Relays
- Sensors (such as temperature and humidity sensors)
- Switches or push buttons
Connect these components as per the provided circuit diagram. It is important to note that when using latched switches, ensure that the switch connected to GPIO D3 is turned off during the booting process of the NodeMCU to prevent any booting failures. However, if you are using push buttons, no such limitation exists.
Configuring the Blynk Cloud Account
To enable the project’s functionality, we need to configure the Blynk cloud account. You can refer to the provided template and web dashboard in our previous project to set up the necessary data streams and automations. More details, including step-by-step instructions and codes, can be found in the accompanying article at Techal.
Save Data Permanently with Preferences Library
To ensure the ESP8266 remembers the GPIO states in its flash memory, we employ the Preferences library. By opening a namespace called “relay_State” in read-write mode, we can store key-value pairs of data in the ESP8266 flash memory. This library eliminates the need for external storage devices and provides a simple yet efficient solution.
Controlling Relays with Manual Switches and IR Remote
In the main code, we use void setup() and void loop() functions to control the relays. Through the ir_Remote function, we can check for data from the IR receiver and change the state of the relay accordingly. The current state of the relay is then stored in the flash memory using the putBool function.
Similarly, the manual_control function allows control of the relays using manual switches. It stores the current state of the relay in the flash memory, ensuring the state is persistent even after power interruptions.
Setting up the Mobile Dashboard
To control the smart home with ease, we configure the mobile dashboard using the Blynk IoT app. You can find detailed instructions and a video demonstration on our website. The mobile dashboard allows you to turn on and off the relays, modify automations, and monitor the status of your devices.
Conclusion
With the NodeMCU ESP8266 Blynk project, you can create an advanced smart home system that caters to your specific needs. From controlling appliances remotely to incorporating sensors and automations, the possibilities are endless. For more detailed instructions and codes, visit Techal to access the full article.
FAQs
-
Q: Can I use this project for my final year engineering project?
- A: Absolutely! This project is well-suited for final year engineering projects, allowing you to showcase your skills in IoT and home automation.
-
Q: Are there any specific programming languages required for this project?
- A: To code the NodeMCU ESP8266, you will primarily use Arduino programming language and the Blynk platform.
-
Q: Can I control the smart home using voice commands?
- A: Yes, you can integrate voice control using additional modules such as Amazon Echo or Google Home.
For any further questions or assistance, feel free to leave a comment below the article, and our team at Techal will be glad to help.
Remember, Techal is here to empower you with knowledge, providing comprehensive guides, insightful analysis, and exciting technology facts. Stay tuned for more informative articles that explore the ever-evolving world of technology.
