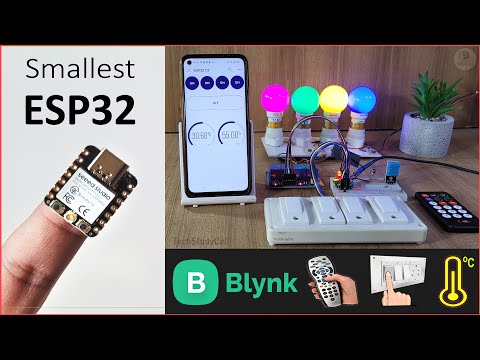
Welcome to Techal! Today, we will show you how to build a complete home automation system using the tiny ESP32 Sweet Tree board. With this project, you can control four appliances using the Blink IoT app, an IR remote, and manual switches. Additionally, we will incorporate a DHT11 sensor to monitor the room temperature. Let’s get started!

Contents
Introducing the ESP32 C3 Development Board
The ESP32 C3 development board, from the Seed Studio Xiao series, is a small yet powerful microcontroller board. Its compact size and affordable price (under $5) make it an excellent choice for building your automation system. With a boot button, reset button, inbuilt battery charger, and indicator LED, this board is designed for convenience and ease of use.

Circuit Setup
To control the relays and connect the other components, we will use all the available GPIO pins of the ESP32 C3 development board. The circuit is straightforward, with manual switches connected across the GPIO pins and ground pin. The relay module controls the AC lamps, and we have also integrated a DHT11 sensor and an IR receiver. It is recommended to build this circuit on a Zero PCB for a more secure connection.

Configuring the Blink IoT Cloud
Before programming the microcontroller, let’s quickly set up the Blink IoT Cloud. You can download the source code for this project from our website here. After installing the latest ESP32 board in the Arduino IDE, copy the preference URL and update it in the IDE’s preferences. Then, install the ESP32 board through the board manager, selecting the “Xiao ESP32 C3” option.
Next, update the template ID, device name, authentication token, Wi-Fi name, Wi-Fi password, and IR remote button hex codes in the source code. Finally, upload the code to the ESP32 C3 microcontroller and connect it to the Blink server. You can monitor the temperature and humidity readings from the DHT11 sensor through the Blink app.
Controlling Appliances
Once everything is set up, you can control the appliances using the Blink IoT app, the IR remote, or the manual switches. The app provides a user-friendly interface to turn appliances on or off, and the IR remote allows you to control the lamps individually. Even if you turn off the power supply, the appliances will automatically restore their previous states when power is restored.
FAQs
Q: Can I use other development boards for this project?
A: Yes, you can use other ESP32 development boards, but the ESP32 C3 board offers a compact size and convenience at an affordable price.
Q: Where can I download the source code for this project?
A: You can download the source code from our website here.
Conclusion
Building a home automation system using the smallest ESP32 sensor is an exciting project that offers convenience and control over your appliances. With the Blink IoT app, an IR remote, and manual switches, you can effortlessly manage your home environment. We hope you found this guide helpful. Stay tuned for more projects and updates from Techal!
Thank you for reading, and have a great day!